
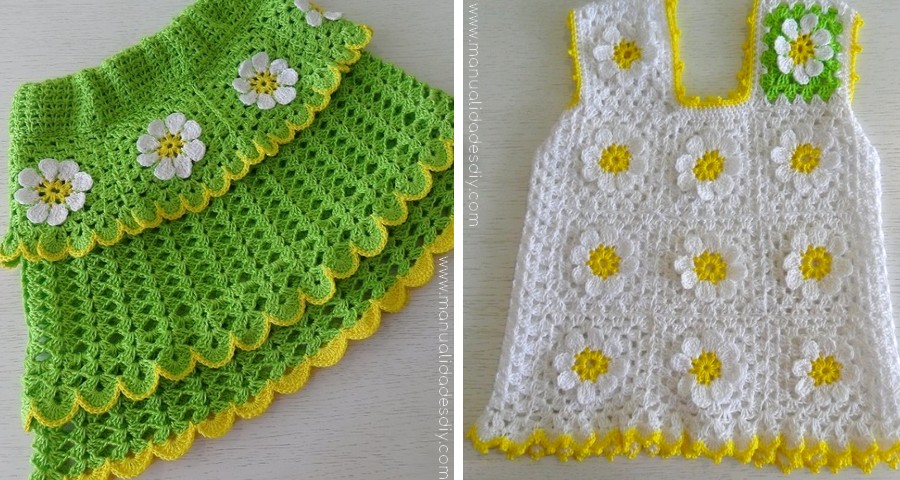
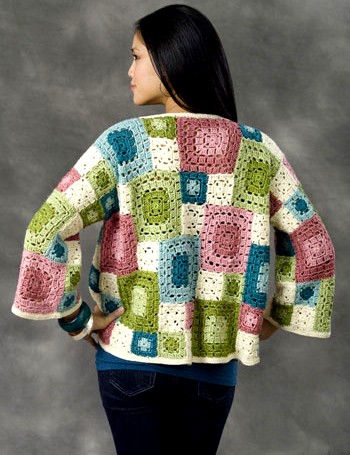
Crochet Jacket with Explanations and graphics
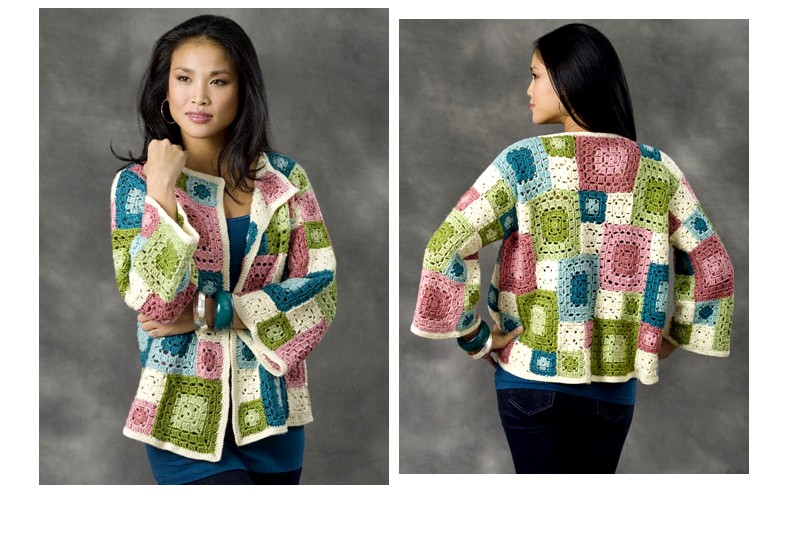
This square jacket is so beautiful, and the color combinations is awesome! Ideal for spring or a summer day. We want to share with you the explanations and graphics, so you can do it.
Let's work!
designed by Diane Moyer
YARN
75% Microdenier acrylic, 25% Merino wool; 3 oz/100 g, 185 yds/170 m ball):
9 (12) oz (A), 6 oz (B), 6 oz (C), 6 oz (D), 6 oz (E), 6 oz (F), 6 oz (G)
Shown in:
#0007 Naturally (A);
#0001 Rose Bisque (B);
#0009 Renaissance Rose (C);
#0005 Ocean Spray (D);
#0013 Spruce (E);
#0004 Green Sheen (F),
#0012 Foliage (G)
One size US I-9 (5.5mm) crochet hook, or size to obtain gauge;
One size US H-8 (5mm) crochet hook (for edging only)
Yarn needle
SIZES
S–L (1X–3X)
FINISHED MEASUREMENTS
Bust: 46 (52)"/117 (132) cm
Length: 20 1/2 (23 1/2)"/52 (59.5) cm
GAUGE
One Large square = 5 1/2 x 5 1/2"/14 x 14 cm, blocked;
One Small square = 2 1/2 x 2 1/2"/6.5 x 6.5 cm, blocked.
Note: The squares tend to stretch. Be sure to make a swatch and block it, to check gauge. Adjust size if necessary.
STITCHES USED
Chain (ch), double crochet (dc), single crochet (sc), slip stitch (sl st).
NOTES
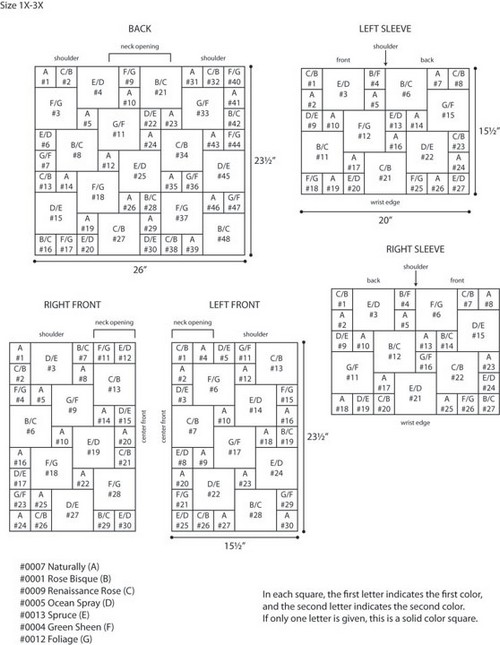
1. The back and fronts are formed from large and small granny squares. Each square is joined to any previous squares when the final round (joining round) of the square is worked. Refer to the assembly diagrams for the placement of squares. Squares on the assembly diagram are numbered. Begin with square #1 and work to completion. Then work square #2, and on the final round, join square #2 (working square) to the square #1 (previous square).
2. The back and fronts are worked separately. The shoulder seams are then sewn. Next, the sleeves are worked directly onto the body, from the shoulder down to the wrist edge. The side and sleeve seams are then sewn. If desired, the sleeves can be worked separately and then sewn to the body, before sewing the side and sleeve seams.
3. The fronts are wider than half the back width, to allow for overlap when closing jacket with a pin.

LARGE SQUARE
Note: Make the squares in the color combinations indicated on the assembly diagram, or as desired.
With first color and larger hook, ch 4; join with sl st in first ch to form a ring.
Round 1 (RS): Ch 3 (counts as dc here and throughout), 2 dc in ring, ch 2, [3 dc in ring, ch 2] 3 times; join with sl st in top of beginning ch—Four 3-dc groups, and 4 ch-2 sps. Fasten off.
Round 2: Sl st in each st to next ch-2 sp, sl st in next ch-2 sp, ch 4 (counts as sc, ch 3 here and throughout), sc in same ch-2 sp, [ch 3, (sc, ch 3, sc) in next ch-2 sp] 3 times, ch 3; join with sl st in first ch of beginning ch—8 sc, and 8 ch-3 sps.
Round 3: Sl st in first ch-3 sp, ch 3, (2 dc, ch 3, 3 dc) in same ch-3 sp (corner made), ch 1, 3 dc in next ch-3 sp, ch 1, [(3 dc, ch 3, 3 dc) in next ch-3 sp (corner made), ch 1, 3 dc in next ch-3 sp, ch 1] 3 times; join with sl st in top of beginning ch—4 corners, 12 dc (one 3-dc group on each side), and 8 ch-1 sps (two ch-1 sps on each side). Fasten off.
Round 4: With RS facing, join 2nd color with sl st in any corner ch-3 sp, ch 4, sc in same ch-3 sp, [ch 3, *sc in next ch-1 sp, ch 3; rep from * to next corner ch-3 sp, (sc, ch 3, sc) in corner ch-3 sp] 3 times, ch 3, **sc in next ch-1 sp, ch 3; rep from ** around; join with sl st in first ch of beginning ch—16 sc, and 16 ch-3 sps.
Round 5: Sl st in first ch-3 sp, ch 3, (2 dc, ch 3, 3 dc) in same ch-3 sp, [ch 1, *3 dc in next ch-3 sp, ch 1; rep from * to next corner ch-3 sp, (3 dc, ch 3, 3 dc) in corner ch-3 sp] 3 times, ch 1, **3 dc in next ch-3 sp, ch 1; rep from ** around; join with sl st in top of beginning ch—4 corners, 36 dc (three 3-dc groups on each side), and 16 ch-1 sps (four ch-1 sps on each side). Fasten off.
Round 6: Sl st in each st to next ch-3 sp, sl st in next ch-3 sp, ch 4, sc in same ch-3 sp, [ch 3, *sc in next ch-1 sp, ch 3; rep from * to next corner ch-3 sp, (sc, ch 3, sc) in corner ch-3 sp] 3 times, ch 3, **sc in next ch-1 sp, ch 3; rep from ** around; join with sl st in first ch of beginning ch.
Note: Refer to assembly for placement of working square. If working square is first square in a piece, work Round 7 (non-joining round), otherwise, work Round 7 (joining round).
Round 7 (non-joining round): Repeat Round 5. Fasten off.
Joining Notes:
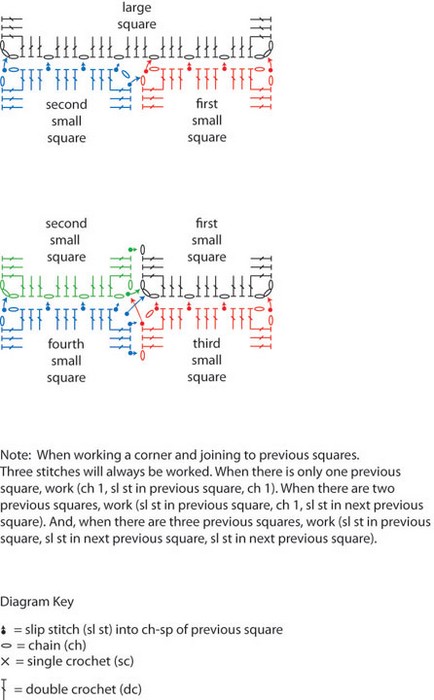
1. There are several different ways that the squares are joined, depending on the number and/or size of the squares being joined. Each large square has 7 groups of 3-dc per side, and each small square has only 3 groups of 3-dc per side. When 2 small squares are joined to a large square, the extra 3-dc group in the center of the large square must be handled differently. The first small square is joined to one side of the center 3-dc of the large square; the second small square is joined to the first small square (with a sl st in the corner of the small square) and to the other side of the center 3-dc of the large square. Refer to the joining diagrams.
2. When working a corner and joining to previous squares. Three stitches will always be worked. When there is only one previous square, work (ch 1, sl st in previous square, ch 1). When there are two previous squares, work
(sl st in previous square, ch 1, sl st in next previous square). And, when there are three previous squares, work
(sl st in previous square, sl st in next previous square, sl st in next previous square). Refer to the joining diagrams.
Round 7 (joining round): Sl st in first ch-3 sp, ch 3, (2 dc, ch 3, 3 dc) in same ch-3 sp, [ch 1, *3 dc in next ch-3 sp, ch 1; repeat from * to next corner ch-3 sp; 3 dc in corner ch-3 sp, ch 1, sl st in corner ch-sp of previous square, ch 1, 3 dc in same corner ch-3 sp of working square, **sl st in next ch-1 sp of previous square, 3 dc in next ch-3 sp of working square; repeat from ** to next corner ch-3 sp of working square, working last 3 dc in corner ch-3 sp of working square, ch 1, sl st in corner ch-sp (or next ch-1 sp) of previous square, ch 1, 3 dc in same corner ch-3 sp or working square; continue in this manner to join working square and any previous squares and to complete the round. Refer to the joining notes and joining diagrams. Fasten off.
SMALL TWO-COLORED SQUARE
Note: Make the squares in the color combinations indicated on the assembly diagram, or as desired.
With first color and larger hook, ch 4; join with sl st in first ch to form a ring.
Round 1 (RS): Work Round 1 of large square. Fasten off.
Round 2: With RS facing, join second color with sl st in any ch-2 sp, ch 4 (counts as sc, ch 3 here and throughout), sc in same ch-2 sp, [ch 3, (sc, ch 3, sc) in next ch-2 sp] 3 times, ch 3; join with sl st in first ch of beginning ch—8 sc, and 8 ch-3 sps.
Note: Refer to assembly for placement of working square. If working square is first square in a piece, work Round 3 (non-joining round), otherwise, work Round 3 (joining round).
Round 3 (non-joining round): Repeat Round 3 of large square. Fasten off.
Round 3 (joining round): Sl st in first ch-3 sp, ch 3, (2 dc, ch 3, 3 dc) in same ch-3 sp (corner made), ch 1, 3 dc in next ch-3 sp, ch 1, 3 dc in next corner ch-3 sp of working square, ch 1, sl st in corner ch-sp of previous square, ch 1, 3 dc in same corner ch-3 sp of working square, *sl st in next ch-1 sp of previous square, 3 dc in next ch-3 sp of working square; repeat from * to next corner of working square, working last 3 dc in corner ch-3 sp of working square, ch 1, sl st in corner ch-sp (or next ch-1 sp) of previous square, ch 1, 3 dc in same corner ch-3 sp of working square; continue in this manner to join working square and any previous squares and to complete the round. Refer to the joining notes and joining diagrams. Fasten off.
SMALL SOLID SQUARE
With A and larger hook, ch 4; join with sl st in first ch to form a ring.
Rounds 1 and 2 (RS): Work Rounds 1 and 2 of large square. Do not fasten off.
Note: Refer to assembly for placement of working square. If working square is first square in a piece, work Round 3 (non-joining round), otherwise, work Round 3 (joining round).
Round 3 (non-joining round): Repeat Round 3 of large square. Fasten off.
Round 3 (joining round): Repeat Round 3 (joining round) of small two-colored square. Fasten off.
BACK
Following assembly diagram, work square #1 to completion. Then work square #2 and complete through to the last round. As you work the last round, join the working square to the previous square. Continue working and joining squares until the back is complete.
FRONTS
Choose a front piece. Following assembly diagram for that piece, work square #1 to completion. Then work square #2 and complete through to the last round. As you work the last round, join the working square to the previous square. Continue working and joining squares until the front is complete. Repeat for the other front.
When back and both fronts are complete, sew shoulder seams. When sewing the shoulder seams, begin at the arm opening and work toward the neck. Try the garment on and adjust if necessary. Remember to allow for edging.
SLEEVES
Note: The sleeves are joined to the body as you go. Take care to join the first row of squares to the body of the garment.
Choose a sleeve. Following assembly diagram for that piece, work square #1 and join to body as you go. Then work square #2 and complete through to the last round. As you work the last round, join the working square to the previous square (and body of garment, if needed). Continue working and joining squares until the sleeve is complete. Repeat for the other sleeve.
FINISHING
Sew side and sleeve seams. Weave ends.


source: www.naturallycaron.com/projects/tulsa/tulsa_4.html
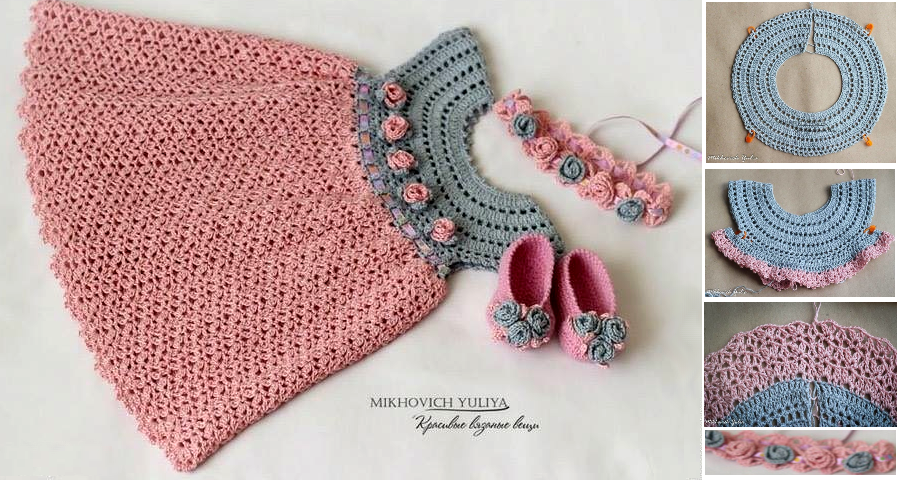
Crochet skirt and blouse set for girl
Creating a crochet coat whit a beautiful crochet pattern
Gorgeous Crochet Girl Dress - Step by Step
Leave a Reply
Related posts