


This ‘guide’ is a strict pattern, it can be adapted to any size and is wildly forgiving, because it is so easy to change to whatever size you decide to make it. It belongs to maybematilda.com
All you’ll need to know in order to size it properly for the person you’re gifting to is their head size.
The foundation single crochet is perfect for a project like this where we start with the brim and work our way up. Stretchy brims are definitely a good thing.

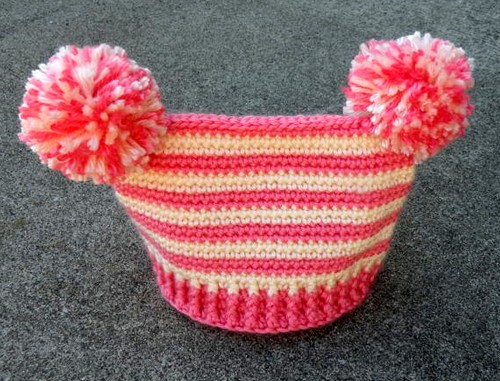
Double Pom Pom Hat
Materials:
- bulky weight yarn or 2 strands of worsted weight yarn (I can’t give much detail on how much yarn you’ll need—it will depend on the hat size you make—but for the pictured hat made for a 1-year old baby, I used almost 1 full skein of Red Heart Super Saver.)
- K hook (10 mm)
- blunt large-eye needle for sewing tails in
- optional: pom pom maker
Abbreviations:
fsc = foundation single crochet
dc = double crochet
sl st = slip stitch
fpdc = front post double crochet
bpdc = back post double crochet
ch = chain
Notes:
Hat is worked from brim up. Do not turn your work at the end of each row. The finished hat will be roughly square shaped, with 2 pointed corners at the top, where you will place your pom poms. Leave a long yarn tail at the end of your work to sew the top of the hat closed.
1) Start with a row of fsc long enough to reach easily around the head of the person you’re crocheting for. So if you are making this hat for, say, a 9-month old baby, work fsc until your piece measures about 18 inches in length.
Sl st to join your work in a loop (make sure the loop is flat and has not twisted!).
2) Ch 2, dc in each stitch around. Join with sl st to top of starting ch.
3) Ch 2, *fpdc in next stitch, bpdc in next stitch. Repeat from * around. Join with sl st to top of starting ch.
4) Repeat row 3, working fpdc in each fpdc of previous row and bpdc in each bpdc of previous row.
5) Ch 2, dc around in back loop only of each stitch. Join with sl st to top of starting ch.
6) Ch 2, dc around. Join with sl st to top of starting ch.
7-) Repeat row 6 until desired hat ‘height’ is reached. Add roughly 2 inches to suggested hat heights, since this style is meant to sit high on the head and fit loosely. Fasten off when desired height is reached, leaving long yarn tail.
Use ending yarn tail to stitch the top of the hat closed. Simply lay the hat flat with the seam centered in the back, and sew back and forth with the ending yarn tail to create a long, flat seam. The hat will look square. Sew in all yarn tails.
Using a pom pom maker, make 2 large pom poms. Sew pom poms to top corners of hat.
See more photos for inspiraton...


Related posts